Instructions for assembly
조립 방법
For further information refer to: http://www.sellesmp.com, or you can download these instructions in a Pdf by clicking here.
자세한 내용은 위 사이트를 참조하거나 PDF파일을 다운로드 하려면 저기를 클릭하시오.
1. GENERAL PRINCIPLES
1. 일반 원칙
Our saddles are designed to distribute body weight between the buttocks and lower part of the pelvic bone.
The weight balance and comfort therefore depend on how the ischial tuberosities rest on the saddle while pedalling.
This position depends on various factors:
우리 안장은 엉덩이와 골반 뼈의 아래 부분 사이에 체중을 분배하도록 설계되었습니다.
따라서 체중 균형과 편안함은 좌골 결절이 페달에서 안장에 어떻게 실려 있는지에 달려 있습니다. 이 위치는 다양한 요인에 따라 달라집니다.
the height of the saddle in relation to the pedals
페달에서 안장까지의 높이
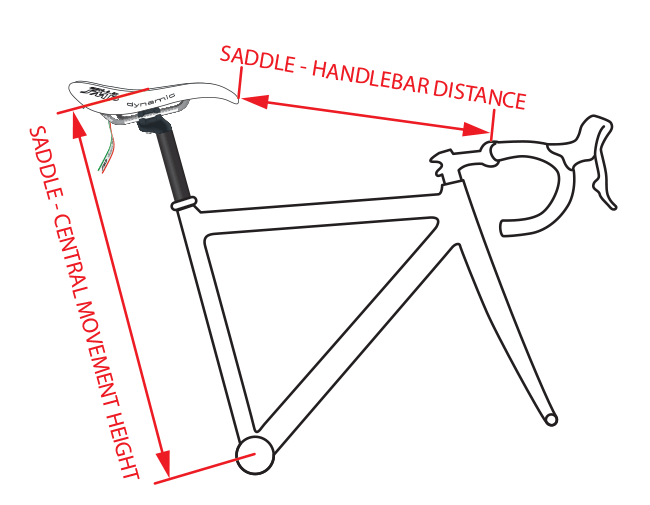
the distance between the saddle and the handlebars
안장과 핸들바 사이의 거리
the tilt of the saddle
안장의 기울기
These parameters are adjusted by the cyclist according to their personal characteristics;
for best results it is essential to perform the installation by following the steps in the procedure described in the following pages.
이 변수는 개인 특성에 따라 자전거 타는 사람이 조정합니다. 최상의 결과를 얻으려면 다음 페이지에서 설명하는 절차의 단계에 따라 설치를 수행해야 합니다.
2. PRELIMINARY POSITION
2. 시작 위치
On a new frame
새 프레임에서
Secure the saddle observing the distance from the handlebar and saddle height recommended by the bicycle manufacturer based
on your measurements.
자전거 제조업체에서 권장하는 안장 높이와 핸들 바의 위치에 안장을 고정 시킵니다.
Replacing the old saddle
오래된 안장 교체하기
1. Measure the distance from the old saddle to the handlebars.
1. 오래된 안장에서 핸들 바까지의 거리를 측정합니다.
2. Measure the distance between the upper side of the saddle and the central movement rotation centre.
2. 안장 윗면과 안장의 중심축 사이의 거리를 측정합니다.
3. Place the new SMP saddle using as a reference the same measures.
3. 동일한 측정 값을 기준으로 새로운 SMP 안장을 설치합니다.
3. LEVELLING
3. 레벨링
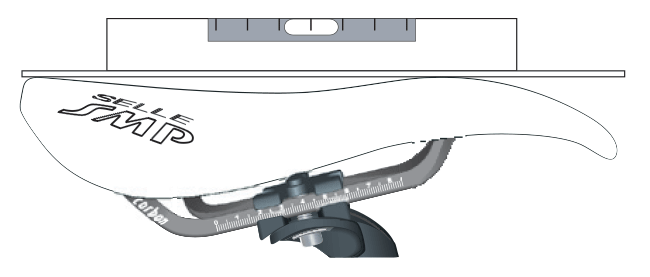
Using a level, adjust tilt using the clamp so that the saddle is horizontal.
레벨을 사용하여 안장이 수평 되도록 클램프를 사용하여 기울기를 조정합니다.
4. FINE ADJUSTMENT (ROAD TEST)
4. 미세 조정(도로 시험)
Once the saddle is positioned following the previous instructions,
use an Allen key on the clamp to make fine adjustments to how the saddle “feels” until you find your perfect balance on the saddle and
the right compromise between the saddle pillar and ischial tuberosities.
안장이 이전 단계에 따라 설치되면, 알렌 키를 사용하여 안장의 완벽한 균형과 좌골 결절 사이의 적정값을 찾을 때까지 위치를 미세하게 조정합니다.
The saddle nose tilt can be adjusted between + 10 and - 25 mm -
안장 코 기울기는 +10 ~ -25mm 사이에서 조정합니다.

and the distance between the saddle point and handlebars can be reduced by 5 - 10 - 15 mm.
안장 지점과 핸들 바 사이의 거리는 5 - 10 - 15mm 까지 조절할 수 있습니다.

5. RECOMMENDATIONS REGARDING THE PILLAR
5. 기둥에 관한 중요사항
The pillar has a significant impact on saddle frame resistance: For this reason Selle SMP recommends a pillar with the following characteristics:
기둥은 안장 프레임 저항에 중대한 영향을 미칩니다. 이러한 이유로 다음과 같이 설치하길 권장합니다.
1. It should allow correct saddle positioning.
1. 올바른 안장 위치에 설치합니다.
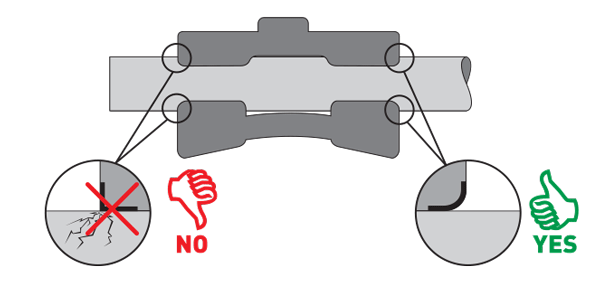
2. It should not have sharp edges which, by cutting, could compromise saddle frame resistance.
2. 안장의 프레임을 손상시킬 수 있는 날카로운 모서리가 없어야 합니다.
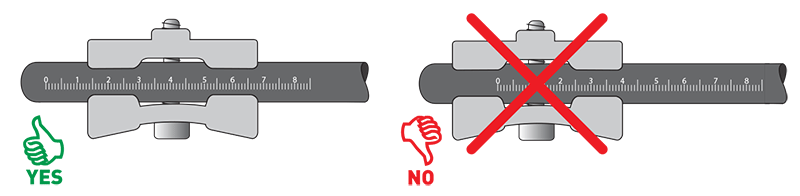
3. The jaws should have the same external surface shape as the saddle frame to correctly fit with a wide contact surface.
3. 턱은 넓은 접촉면에 정확하게 맞도록 안장 프레임과 동일한 모양을 가져야 합니다.
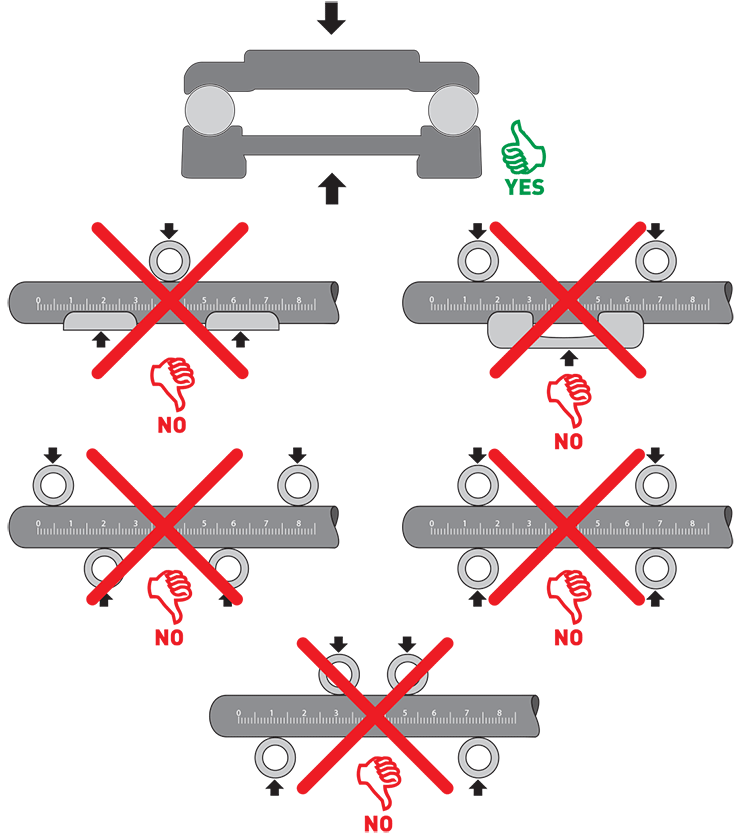
4. The contact area between the pillar and the saddle frame should not be under 8 cm.
4. 필러와 안장 프레임 사이의 접촉 면적은 8 cm 이하여야 합니다.
5. The jaws should connect with the saddle frame for a minimum length of 32 mm.
5. 턱은 안장 프레임과 최소 32mm의 길이로 연결해야 합니다.

6. The coupling surfaces with the saddle frame should be symmetrical and parallel.
6. 안장 프레임과 결합면은 대칭 및 평행해야 합니다.
7. The jaws should not cause deformation or damage to the saddle frame.
7. 안장 프레임을 변형 시키거나 손상 시키면 안됩니다.
8. The pillar jaws should not protrude beyond the graphed area.
8. 안장 프레임이 그래프 영역을 넘어서서는 안됩니다.
9. The closing torque recommended by the pillar manufacturer must be strictly abided by.
9. 필러 제조업체가 권장하는 Closing torque는 반드시 준수하여야 합니다.
10. The pillar must meet UNI EN 14781 European standards – Racing bicycle -
Test requirements and methods and UNI EN 14766 - Mountain bike - Safety requirements and test methods.
10. 필러는 유럽 기준의 UNI EN 147(경주용) 과 UNI EN 14766(산악용) 의 안전 요구사항을 준수해야 합니다.
ADDITIONAL PILLAR REQUIREMENTS
추가 필러 요구사항
For saddles with carbon fibre chassis (Full Carbon and CRB versions)
탄소 섬유(풀 카본 및 CRB 버전)의 경우
11. If a lateral clamp pillar is used, we recommend using jaws with a range and profile suited to house the carbon
fibre saddle frame with 7.1 x 9.6 mm.
11. 측면 클램프 필러를 사용하는 경우, 탄소 섬유 안장 프레임을 수용할 수 있는 범위와 프로파일을 가진 7.1 x 9.6mm 로 사용하는 것이 좋습니다.

For further information, please refer to the pillar manufacturer’s instructions.
자세한 내용은 필러 제조업체의 지침을 참조 하십시오.

'게시판' 카테고리의 다른 글
| 펜슬드로잉 | 강다니엘 그리기 aka 워너원 (0) | 2018.03.23 |
|---|---|
| PODCAST | XSFM 비만의 과학 (0) | 2018.03.20 |
| 브롬톤 적응 (0) | 2018.03.14 |
| 색연필 드로잉 | 윤아 aka 소녀시대 그리기 (0) | 2018.03.14 |
| 색연필 드로잉 | 쇼트트랙 최민정 그리기 (0) | 2018.03.08 |